Tried and True Tres Leches Cake

What do I love more than milk? Three kinds of milk!! Ever since my friend Sunni introduced me to tres leches, I have been hooked! I was a little nervous making this since Sunni only made things that were ridiculously complicated and had a chance of exploding, but I figured it was worth the risk.

While I can't say if this is as good as hers (unfortunately it has been far too long for me to recall), it was pretty fabulous and I will most definitely be making it again. We had a progressive dinner this past weekend with several of our new neighbors and I volunteered to do the dessert course. As my neighbor Kevin would say, this cake was "stupid good". So good that I could only snag a lonely corner piece to take pictures of. Next time I hope to plan a little better and take some shots of it before its completely devoured.

I always get nervous when trying out a new recipe, but this one from Cook's Country did not disappoint. My husband did suggest adding a little dulce de leche / salted caramel drizzle to it next time, but it was fabulous just on its own. So good that I'm even considering throwing tradition out the window and making it for Thanksgiving this year. And I'm not even kidding.

***UPDATE: Since this initial post, this recipe has become a staple in our household. It is so good that I haven't even bothered looking for another recipe. I hope you enjoy!
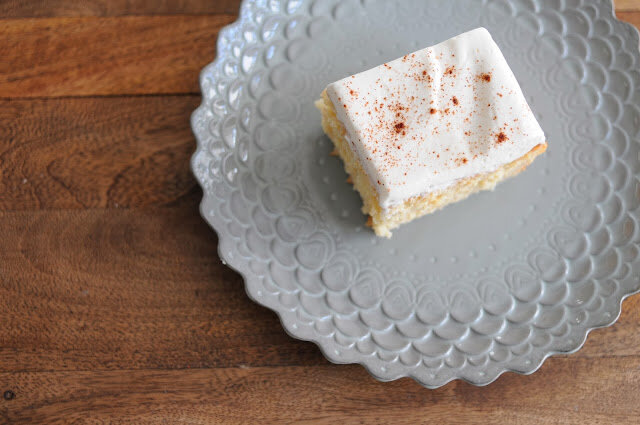
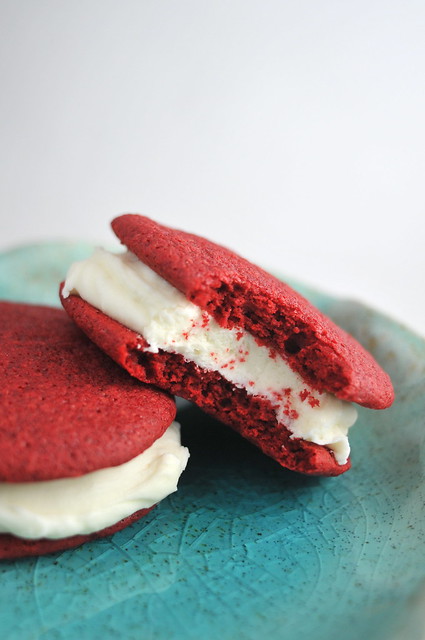
Mmmmm, tres leches.

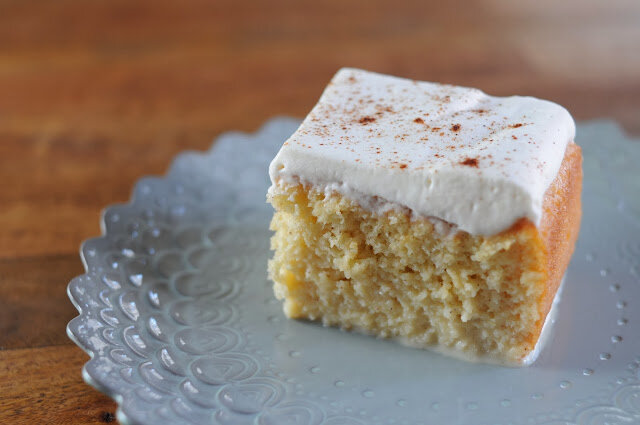
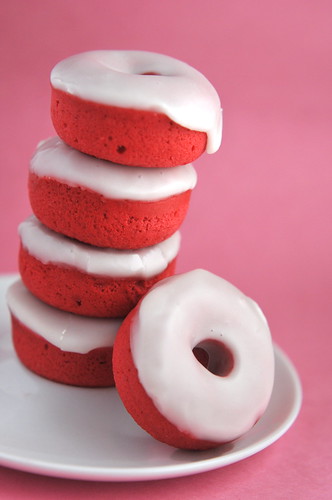
Tres leches. Good for just about any time of day. Nom nom nom.

Tres Leches Cake from Cook's Country

Milk Mixture


  • 1 (14-ounce) can sweetened condensed milk
  • 1 (12-ounce) can evaporated milk
  • 1 cup heavy cream
  • 1 teaspoon vanilla extract  
Cake
  • 2 cups all-purpose flour
  • 2 teaspoons baking powder
  • 1 teaspoon salt
  • 1/2 teaspoon ground cinnamon
  • 8 tablespoons (1 stick) unsalted butter
  • 1 cup whole milk
  • 4 large eggs, room temperature
  • 2 cups sugar
  • 2 teaspoons vanilla extract
 Whipped Topping
  • 1 cup heavy cream
  • 3 tablespoons corn syrup
  • 1 teaspoon vanilla extract

  1. For the milk mixture: Pour condensed milk into large microwave-safe bowl and cover tightly with plastic wrap. Microwave on low power, stirring and replacing plastic every 3 to 5 minutes, until slightly darkened and thickened, 9 to 15 minutes. Remove from microwave and slowly whisk in evaporated milk, cream, and vanilla. Let cool to room temperature.
  2. For the cake: Adjust oven rack to middle position and heat oven to 325 degrees. Grease and flour 13 by 9-inch baking pan. Whisk flour, baking powder, salt, and cinnamon in bowl. Heat butter and milk in small saucepan over low heat until butter is melted; set aside off heat.
  3. With electric mixer on medium speed, beat eggs in large bowl for about 30 seconds, then slowly add sugar until incorporated. Increase speed to medium-high and beat until egg mixture is very thick and glossy, 5 to 7 minutes. Reduce speed to low and slowly mix in melted butter mixture and vanilla. Add flour mixture in three additions, scraping down bowl as necessary, then mix on medium speed until fully incorporated, about 30 seconds. Using rubber spatula, scrape batter into prepared pan and bake until toothpick inserted into center comes out clean, 30 to 35 minutes (it took me the full 35). Transfer cake to wire rack and let cool 10 minutes.
  4. Using skewer, poke holes at 1/2-inch intervals in top of cake. Slowly pour milk mixture over cake until completely absorbed. Let sit at room temperature 15 minutes, then refrigerate uncovered 3 hours or up to 24 hours 
  5. For the frosting: Remove cake from refrigerator 30 minutes before serving. With electric mixer on medium speed, beat heavy cream, corn syrup, and vanilla to soft peaks, 1 to 2 minutes. Frost cake and slice into 3-inch squares. Sprinkle with just a tad of cinnamon and serve. (The assembled cake can be refrigerated for up to 3 days.)

Quite a Doozie

DSC_7281Doozie (also doozy): Something that is extraordinary. Often used in the context of troublesome, difficult or problematic, but can be used positively as well.

As a kid I always loved going to Great American Cookie Company and getting a Double Doozie cookie. Nothing was better than a generous helping of frosting sandwiched between two freshly baked cookies.

Now one could infer that Great American Cookie Company coined the name "Double Doozie" because it is in fact, wonderful and extraordinary, but I beg to disagree. I like to think that this cookie originated after someone was having a horrendous, albeit "doozie" of a day. One of those days when you feel like you just can't... possibly... make... one... more... decision.

Do I want a cookie? Yes. Do I want cake? Yes. Do I want an entire vat of icing? Yes. Indulgence kicks in and before you know it, you're sitting with an empty pint of ice cream, spoon-in-hand, wondering why you feel left unsatisfied. Yes, one of those kinds of days.

Well thankfully for the advent of the Double Doozie, you can have it all - cookie/cake/frosting - in one single serving. What's more, these red velvet sandwich cookies are super easy to make and only take 10 minutes in the oven.

For these cookies I started with Paula Deen's recipe but modified the cocoa and the frosting. While I liked the fluffy, cake texture of the cookies, next time I want to experiment and make them a bit more chewy, and perhaps add in some chocolate chips. If you're making these for a party or gathering I'd double the recipe - this one makes about 12 sandwich cookies. Happy Baking!


Ingredients:
1 1/3 cups all-purpose flour
1 tablespoon plus 1 teaspoon cocoa powder
1 teaspoon baking powder
1/4 teaspoon baking soda
1/2 teaspoon salt
1/4 cup butter, room temperature
1 cup sugar
2 eggs
2 tablespoons buttermilk
2 teaspoons apple cider vinegar
1 teaspoon vanilla extract
1 tablespoon red food coloring
   
For the Cream Cheese Frosting:

1-8 ounce block cream cheese, softened
1 stick butter, softened
1 teaspoon vanilla extract
1 box (approx 4 1/2 cups sifted) powdered sugar
 

Directions:
Preheat oven to 375 degrees F. In a small bowl, mix together the flour, cocoa powder, baking powder, baking soda and salt. In a larger separate bowl, cream together the butter and sugar until light and fluffy, about 3 minutes. Add the eggs one at a time. Beat in the buttermilk, vinegar, vanilla and red food coloring. Once combined, add the dry ingredients to the wet. Mix until thoroughly combined.

Onto a parchment lined sheet tray, drop batter using a small ice cream scoop (or a heaping tablespoon). Bake for 10 minutes, until baked through. Cookies should be cake-like and light. Allow to cool for a few minutes on the baking sheet, then remove to a wire rack to cool completely. (I just slide the parchment from my baking sheet onto the wire rack).

In a large mixing bowl, beat the cream cheese, butter, and vanilla together until smooth. Sift in the sugar and on low speed, beat until incorporated. Increase the speed to high and mix until very light and fluffy. Carefully spread the cream cheese frosting between 2 cooled cookies. Makes approximately 12 sandwich cookies.

Baking Away the Calories (Plus a Giveaway)

Baked red velvet mini doughnuts by the Velveteen BakerIn what seems like eons ago in the blogosphere, I aksed my readers what I should bake next and red velvet donuts were the clear winner.

I started with these cute little mini donut pans from Amazon and figured that by using them I would avoid burning myself with grease (highly probable) and dodge any excess, unnecessary calories. I quickly learned, however, that the calories are in fact my favorite part of the donut.

So I am posting this recipe with a caveat: if you are really craving a donut, I suggest eating a real doughnut (yes, different spelling). Preferably one with actual dough that has been submerged and deep fat fried in a massive vat of grease. Yes, it won't be the healthiest thing, but it can't be much worse than eating 12 baked mini donuts in a single sitting. Right?

But now onto the fun stuff! To apologize for being such a slacker on my postings of late, I've decided to give away two brand-new mini donut pans so all you health conscious folks can make baked donuts of your own! To enter, simply comment on this post with the name of your favorite holiday dessert (and it doesn't have to be red velvet). Deadline to enter is 5pm EST on December 13th has passed. One lucky winner will be chosen at random using random.org and announced on this post.

And the lucky winner is: Jainy! She was the third person to comment on this post with the name of her favorite holiday dessert. Jainy, please send an email to christina@velveteenbaker.com with your full name and mailing address.


Baked Red Velvet Donuts
Modified from Sprinkle Bakes

Donut batter:
2 c all purpose flour, sifted
3/4 c granulated sugar
2 t baking powder
1/2 t salt
3/4 c buttermilk
1 t vanilla extract
1 t red food coloring
1 T natural cocoa powder, not dutch-processed
2 eggs, lightly beaten
2 T butter, melted

Preheat oven to 425°F. Spray donut pan with nonstick cooking spray. In large mixing bowl, sift together all purpose flour, sugar, baking powder and salt. Make a paste with the cocoa and red food coloring. Add buttermilk, eggs, vanilla extract, butter and red paste mixture and beat until just combined.

Fill each donut cup approximately 3/4 of the way full. Bake 5-8 minutes or until the top of the donuts spring back when touched. Let cool in pan for 4–5 minutes before removing. Finish donuts with vanilla glaze. Donuts are best served fresh.

Vanilla glaze:
2 T hot water
2 c confectioner’ s sugar
1 T milk (I substituted buttermilk since it was all I had)
½ t vanilla extract

In small bowl, stir together all ingredients until sugar is completely dissolved. Use immediately to glaze donuts. You can either toss them in or dip just the tops. If the glaze starts to harden you can add more hot water.

Much Ado About Cake Balls

Several weeks back I did a post on the JWT Atlanta blog called The Next Big Thing Could Actually be, Quite Small and asserted my prediction that cake balls were going to be all the rage. Well today I am here to tell you that they are.

Red Velvet Cake Balls w/ Milk ChocolateI was at first a skeptic, but after making some red velvet cake balls from scratch I was truly convinced. There is something so heavenly about homemade red velvet cake and cream cheese icing mixed together, blanked by a nice, rich coating of chocolate.

I'm not going to lie, these little beauties are pretty labor intensive if you make them from scratch. As a matter of fact, you may start to hate me half way through this process and wonder why you ever decided to make these. But this is when you must press on. I assure you that all of your frustration will be worth its weight in gold once you bite into one of these.

Should you choose to make these, here are a few pointers I'd like to offer:
- Find a Kroger and buy a package of their white or dark chocolate bark. You can also use candy melts, but I found them much more difficult to work with.
- Invest in a candy dipping fork or set like this one. Spend a few more dollars on the metal dipping fork, as I rendered my plastic set useless trying to make these.
- You can use any red velvet cake and frosting recipe, but the following is one of my own. If you use another recipe you will need a 9x13 cake, about 2 cups of frosting and 1 or 2 packages of chocolate bark (depending on how much of a perfectionist you are).

For the red velvet cake:
2 1/2 c + 5T cake flour, sift before measuring
1 1/2 c sugar
1t baking soda
1t salt
1T + 1t natural cocoa powder, not dutch-processed
1 1/2 c vegetable oil
1 c buttermilk, room temperature
2 large eggs, room temperature
2T red food coloring
1t white distilled vinegar
1t pure madagascar vanilla

For the cream cheese icing:
2 1/4 c confectioners sugar sifted
4oz (1/2 a block) of cream cheese, softened
1/4 c mascarpone cheese
4T unsalted butter, softened
1/2t pure madagascar vanilla

For the candy coating:
1 or 2 packages of white, milk or dark chocolate bark (while I liked the way the white chocolate looked, the milk/dark chocolate tasted much better). I recommend getting two packages since the chocolate tends to get messy after a while with crumbs from the cake balls.

Directions:
Preheat the oven to 350. In a medium bowl, sift together the flour (pre-measured and sifted), sugar, cocoa, baking soda and salt. In a large bowl, gently beat (speed 1 or 2 of a handheld mixer) the oil, buttermilk, eggs, vinegar, vanilla and red food coloring until blended. Add in the dry ingredients slowly and beat (speed of 1 or 2) until smooth. Pour into a lined and greased 9x13 pan.

Bake at 350 for approximately 30 minutes, turning once half way through. Cool in pan for no more than 10 minutes, then transfer to a wire rack to cool completely. Once your cake has cooled, shave off any hard edges of the cake using a serrated knife.

In a large bowl beat the cream cheese, mascarpone, butter and vanilla until smooth. Slowly sift in the confectioners sugar and beat on a low speed until incorporated. Increase the speed until fully blended. Now here's the fun part. Take your cake and crumble it into a large mixing bowl. Add up to two cups of the cream cheese icing and mix with a spatula (or with your hands if you don't mind getting a little messy) until fully incorporated. It will be the consistency of a thick dough. Roll the mixture into balls and lay onto a cookie sheet. Place in the freezer until ready to coat in chocolate.

Before coating the cake balls must chilled, but not completely frozen. Melt the chocolate bark in microwave according to directions on package. Dip and cover one cake ball at a time using either a spoon or a dipping fork and place on a parchment lined cookie sheet. I like to take one or two cake balls out of the freezer at a time, as they are easier to work with that way. You can cover up any mishaps with a second coating (or drizzle) of chocolate once the first layer has hardened.

Good luck and let me know how it goes!

Study Shows Ad Execs Prefer Younger Cakes

Red Velvet w/ Ermine Icing No. 3
For my latest baking adventure I decided to pit two recipes against each other. Both were featured in the New York Times, but published 30 years apart. I wanted to see if people preferred the younger, more contemporary cake (circa 2007) to the older, more traditional one (circa 1977).

As prefaced in an earlier post, today I brought both cakes into my office to conduct a 'taste' study. As part of the survey, I asked that all participants taste both cakes and rate them on a scale of 1-10. Of the 35 advertising executives included in this study, the vast majority preferred the younger (2007) version.

First Runner Up: Circa 1977 Cake (pictured top left)
The older cake hailed from Alabama and was published on April 25, 1977 in an article entitled Red Velvet Cake Returns, Tomato Paste Lingers On (I assure you the recipe has nothing to do with tomato paste). The icing called for a very unique frosting made of butter, sugar, egg yolks, chopped pecans or walnuts, raisins and bourbon or rum. While I planned to make this frosting all along, I hesitated to remember buying bourbon until Sunday. At that point, no matter how good my intentions, Georgia state law simply wouldn't allow me to make this frosting. So I opted for a more traditional ermine (boiled milk) frosting. Overall feedback was that this cake wasn't as moist as the 2007 cake, but still very tasty. This is not surprising considering the 2007 cake had 2 cups of oil, while this one only called for a 1/2 cup of shortening. Next time I'll probably increase it to a full cup of shortening, or replace it with a cup of vegetable oil. And while I do like the ermine frosting, I would opt for a nice cream cheese frosting (like the one in my first recipe) instead.


Red Velvet w/ Cream Cheese-Mascarpone Icing No. 3The Winner: Circa 2007 Cake (pictured bottom left)
The younger cake was adapted from The Confetti Cakes Cookbook by Elisa Strauss and published on February 14, 2007. The accompanying icing was adapted from The Waldorf-Astoria Cookbook. This recipe is for a three layer cake, but I forced it into two pans with 2" sides and used heating cores to compensate. The recipe creates a lot of batter, so I'd recommend making three layers, but a really thick two layer cake can be done. Overall I felt the cake had too much cocoa powder (1/2 cup), but several of the testers seemed to prefer it. If you're going for a more traditional red velvet, I think you could easily reduce the cocoa anywhere from 2 to 4 tablespoons.

See the detailed recipes below, along with a nifty bar chart that makes my study appear entirely more official.


1977 CAKE RECIPE:
The Cake:

1/2 cup white shortening (consider replacing with 1c veg oil)
1 1/2 cups sugar

2 egg
2 to 4 tablespoons cocoa
 (I used 2)
1/4 cup red food coloring (I used 2 fl oz instead)

1 teaspoon salt
1 c buttermilk
2 1/2 cups sifted flour
 (I used cake flour instead of APF and added 5T to compensate)
1 tablespoon vinegar
1 teaspoon baking soda

  1. Preheat the oven to 350 degrees.
  2. 
Cream together the shortening and sugar in the bowl of an electric mixer until fluffy. Add the eggs, one at a time, beating well after each addition. Beat one minute on medium speed.

  3. Blend the cooca and red food coloring (the amount of coloring may be reduced but the cake will not have its traditional vivid red color) and make a paste. Add this and the salt to the creamed mixture. Blend the vanilla and buttermilk. Alternately add this and the flour to the creamed mixture, beating constantly. Blend the vinegar and soda and beat this in.

  4. Meanwhile, butter and flour two nine-inch cake pans. Shake out the excess flour. Add the cake, batter to each pan and bake 25 to 30 minutes.

  5. Remove the cake layers and let cool on a rack. Turn out.
Ermine Frosting:
1 1/2 cups cold milk
7 tablespoons + 1 1/2 teaspoons sifted cake flour (measure after sifting)
2 1/2 sticks butter, softened
1 1/2 cups granulated sugar
1 1/2 teaspoons vanilla extract
  1. Mix milk and flour in a saucepan; simmer over medium heat until thickened, stirring constantly.
  2. Pour into a bowl. Chill until cool to the touch. 
  3. Cream butter, sugar, and vanilla until light and fluffy. 
  4. Add in chilled milk mixture, and beat until smooth and fluffy.

2007 CAKE RECIPE:
Red Velvet Cake:

1 tablespoon unsalted butter
3½ cups cake flour

½ cup unsweetened cocoa (I'd reduce this to 2-4T)
1½ teaspoons salt

2 cups canola oil

2¼ cups granulated sugar

3 large eggs

6 tablespoons (3 ounces) red food coloring
 (I used 2 ounces instead)

1½ teaspoons vanilla

1¼ cup buttermilk
2 teaspoons baking soda
2½ teaspoons white vinegar
  1. Preheat oven to 350 degrees. Place teaspoon of butter in each of 3 round 9-inch layer cake pans and place pans in oven for a few minutes until butter melts. Remove pans from oven, brush interior bottom and sides of each with butter and line bottoms with parchment.
  2. Whisk cake flour, cocoa and salt in a bowl.
  3. Place oil and sugar in bowl of an electric mixer and beat at medium speed until well-blended. Beat in eggs one at a time. With machine on low, very slowly add red food coloring. (Take care: it may splash.) Add vanilla. Add flour mixture alternately with buttermilk in two batches. Scrape down bowl and beat just long enough to combine.
  4. Place baking soda in a small dish, stir in vinegar and add to batter with machine running. Beat for 10 seconds.
  5. Divide batter among three 9" pans, place in oven and bake until a cake tester comes out clean, 40 to 45 minutes. Let cool in pans 20 minutes. Then remove from pans, flip layers over and peel off parchment. Cool completely before frosting.
Cream Cheese Icing w/ Mascarpone:
2 cups heavy cream, cold
12 ounces cream cheese, at room temperature
12 ounces mascarpone
½ teaspoon vanilla
1½ cups confectioners’ sugar, sifted
  1. Softly whip cream by hand, in electric mixer or in food processor. Cover in bowl and refrigerate.
  2. Blend cream cheese and mascarpone in food processor or electric mixer until smooth. Add vanilla, pulse briefly, and add confectioners’ sugar. Blend well.
  3. Transfer cream cheese mixture to bowl; fold in whipped cream. Refrigerate until needed.

Better with Age?

I simply couldn't decide on a single recipe for my next baking challenge, so instead I chose two.

Since many of the contemporary red velvet recipes differ by only a few ingredients, I thought it would be interesting to juxtapose it with an older, and hopefully more traditional recipe.

I went to the New York Times archives to do some digging, which by the way, is an amazing resource for baking cakes. Not only are their cake recipes some of the most popular, but you can search their archives back to 1851. You won't have any luck finding red velvet until the 20th century, but a good resource nonetheless.


For my first contender I chose a recipe that was published in the NYT on April 25, 1977. Earlier that same year, the NYT published a Q&A about red velvet cake that prompted a flood of responses from readers claiming to have the more authentic recipe. The recipe that was chosen and eventually published was from a woman named Carolyn A. Knutsen who claimed that hers was "an old Southern standard cake" that was passed down from her family in Alabama. Authentic? Perhaps not, but a solid first round pick.

For the opposition I settled on another NYT recipe, but this time published in 2007. I figured, what better competitor to the '77 recipe than one from the same authoritative source, published 30 years later?

And as such, the gauntlet has been thrown. I'll be baking both cakes this weekend and bringing them into my office on Monday to determine the winner. I'll follow up with the recipes, photos and results soon!

A Quest for Perfection

This is my first documented attempt along a journey to create the perfect recipe for red velvet cake. I'm starting with what I know, but plan to venture way back to explore the history of this elusive cake including its boiled icing and beetroot ancestors.

My first recipe has been adapted from Paula Dean's, but I've modified the flour, cocoa and icing, as well as tweaked some of the directions. I received a lot of good feedback from my test subjects (ie work colleagues), and especially on the icing. The cake itself had a nice scarlet color and a good velvety texture, but was still light - a perfect complement to the sweetness of the icing. I find that these cupcakes are usually more moist the following day, so I'd bake them ahead of time and then ice them before you are ready to serve. Try it out and let me know what you think.


For the red velvet cupcakes:

2 1/2 c + 5T cake flour (sift before measuring)
1 1/2 c sugar
1t baking soda
1t salt
1T + 1t natural cocoa powder (not dutch-processed)
1 1/2 c vegetable oil
1 c buttermilk - the fattening kind (room temperature)
2 large eggs (room temperature)
2T red food coloring
1t white distilled vinegar
1t pure madagascar vanilla

For the cream cheese icing:
1lb box of confectioners sugar (a little under 4 1/2 c sifted)
1-8oz block of cream cheese - the fattening kind (softened)
1 stick unsalted butter (softened)
1t pure madagascar vanilla

Directions:
Preheat the oven to 350. In a medium bowl, sift together the flour (pre-measured and sifted), sugar, baking soda and salt. In a small bowl or ramekin, mix together the cocoa and food coloring to form a paste. In a large bowl, gently beat (speed 1 or 2 of a handheld mixer) the oil, buttermilk, eggs, vinegar, vanilla and red paste mixture until blended. Add in the dry ingredients slowly and beat (speed of 1 or 2) until smooth. Divide the batter evenly among lined cupcake tins (I use roughly less than 1/4 c in each).

Bake at 350 for 20 minutes, turning once half way through. Cool in tins for no more than 10 minutes, then transfer to a wire rack to cool completely (about 40 minutes).

In a large bowl beat the cream cheese, butter and vanilla until smooth. Slowly sift in the confectioners sugar and beat on a low speed until incorporated. Then increase the speed until fully blended. Piping cream cheese icing isn't the easiest, so I'd recommend frosting the cupcakes with a spatuala or butter knife.

Happy Baking!